How to connect a Telegram bot to an agent
An O-Key agent is an AI assistant that talks to your clients. You can connect different channels to the same agent, including website chat, WhatsApp, and Telegram. When a client writes to your Telegram bot, the agent replies automatically and the conversation appears in CRM.
Before you start: create a bot in Telegram
Section titled “Before you start: create a bot in Telegram”You need three values before opening CRM:
- the bot token;
- the bot username;
- your personal Telegram username.
If you already have a Telegram bot, skip to the checklist at the end of this section.
Step 1. Find @BotFather
Section titled “Step 1. Find @BotFather”Open Telegram on your phone or computer, search for BotFather, and open the official verified bot.
Step 2. Start BotFather
Section titled “Step 2. Start BotFather”Click Start or send /start. BotFather will show the available commands.
Step 3. Create a new bot
Section titled “Step 3. Create a new bot”Send:
/newbotBotFather will ask for a display name. Enter any clear name, for example:
My O-Key assistantThen BotFather will ask for a bot username. The username must be unique and must end with _bot or Bot, for example:
MyCRM_AssistantBot✅ Save this username. You will need it in CRM.
Step 4. Copy the bot token
Section titled “Step 4. Copy the bot token”After the bot is created, BotFather sends an HTTP API token. It looks like this example:
1234567890:AAHdqTcvCH1vZJf7LJ1c6s9xXmN0zYxECopy the full token and keep it private.
❌ Never share the real token in chats or screenshots. Anyone with the token can control the bot.
Step 5. Find your personal Telegram username
Section titled “Step 5. Find your personal Telegram username”Open Telegram settings and find Username. If it is empty, create and save one. Use it without @, for example ivan_petrov.
At the end of this step you should have:
- the bot token;
- the bot username, for example
MyCRM_AssistantBot; - your personal Telegram username, for example
ivan_petrov.
Open the agent in O-Key CRM
Section titled “Open the agent in O-Key CRM”Step 6. Sign in to O-Key CRM
Section titled “Step 6. Sign in to O-Key CRM”Open the CRM URL provided to you and sign in.
Step 7. Open Agents
Section titled “Step 7. Open Agents”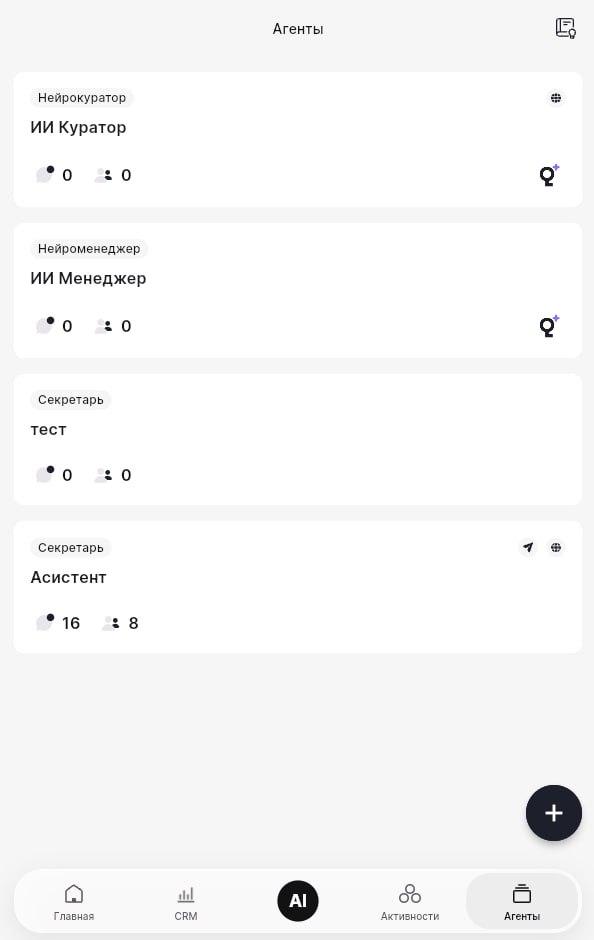
You will see a list of agents. To connect Telegram to a new agent, click Create agent. To connect Telegram to an existing agent, click that agent’s name.
Fill in the required agent settings
Section titled “Fill in the required agent settings”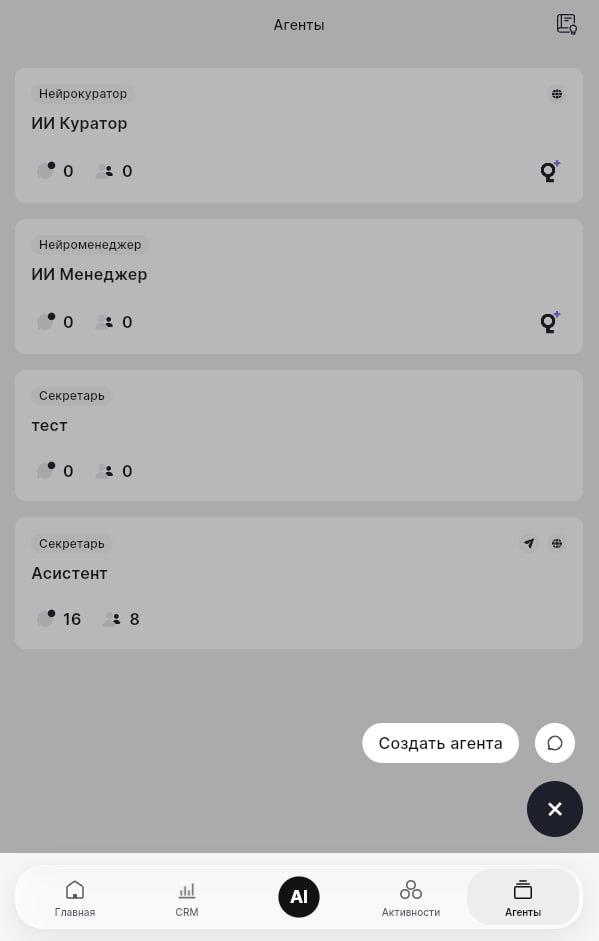
Agent channels
Section titled “Agent channels”The page shows available channels such as Telegram, website card, and WhatsApp. We will configure Telegram in the next section.
Agent name
Section titled “Agent name”Enter an internal name that is clear to you, for example Telegram support assistant or Telegram sales. Clients do not see this internal name.
Knowledge base
Section titled “Knowledge base”A knowledge base is optional at this step. You can add it later, but it is recommended for production use.
Meeting Avatar
Section titled “Meeting Avatar”This is not needed for Telegram.
Agent task
Section titled “Agent task”Choose what the agent should do: FAQ answers, lead generation, product consulting, support, or another available role. If you are unsure, choose consulting and adjust it later.
✅ Do not save yet if you still need to connect Telegram on the same setup page.
Connect the Telegram channel
Section titled “Connect the Telegram channel”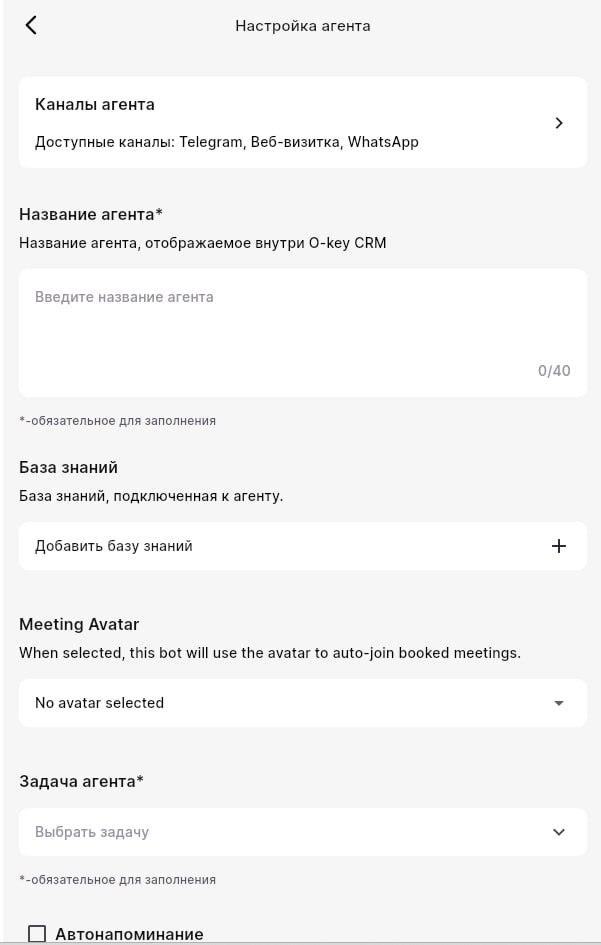

Step 8. Open the Telegram block
Section titled “Step 8. Open the Telegram block”In Channel connections, select Telegram to expand the form.
Step 9. Fill in the Telegram fields
Section titled “Step 9. Fill in the Telegram fields”Bot token
Section titled “Bot token”Paste the token from BotFather. Remove extra spaces before or after it.
Telegram bot username
Section titled “Telegram bot username”Enter the bot username without @. If BotFather gave @MyCRM_AssistantBot, enter MyCRM_AssistantBot.
Your Telegram account username
Section titled “Your Telegram account username”Enter your personal Telegram username without @, for example ivan_petrov.
Step 10. Review the warnings
Section titled “Step 10. Review the warnings”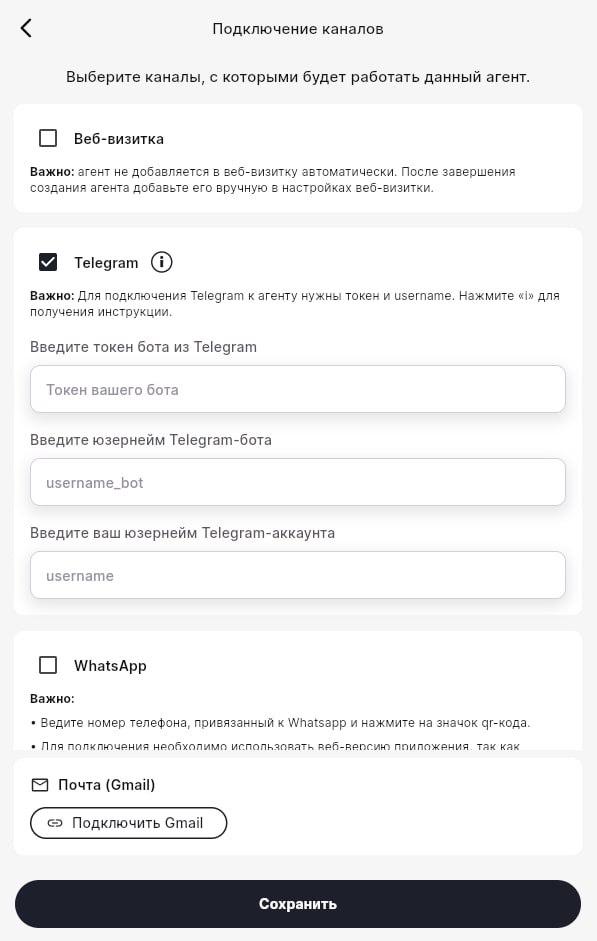
The Telegram instruction note is only a reminder. The WhatsApp and website-card warnings do not affect this Telegram connection.
Save and test
Section titled “Save and test”Step 11. Save the agent
Section titled “Step 11. Save the agent”Click Save at the bottom of the page. O-Key checks that the bot exists, the token matches the username, and the owner username is valid. If everything is correct, the agent becomes active.
Step 12. Test the bot in Telegram
Section titled “Step 12. Test the bot in Telegram”Find your bot by username, click Start, or send Hello. The bot should reply, even if the answer is a default fallback.
If there is no reply, wait one or two minutes and refresh CRM.
Step 13. Check the dialog in CRM
Section titled “Step 13. Check the dialog in CRM”Open the agent again and check Dialogs or Chats. You should see the message you just sent.
Troubleshooting
Section titled “Troubleshooting”| Problem | Likely cause | What to do |
|---|---|---|
| The bot does not reply in Telegram | Wrong token | Copy the token again from BotFather: /mybots → select bot → API Token. |
| CRM says the bot username is invalid | Username was entered with @ or wrong capitalization | Enter the exact bot username without @, preserving case. |
| CRM says owner was not found | Your personal username is wrong or empty | Open Telegram settings, confirm your username, and enter it without @. |
| The bot replies incorrectly | Knowledge base or task is not configured | Update the agent task and connect a knowledge base. |
| Saving hangs | Temporary connection issue | Refresh the page and click Save again. |
Quick checklist
Section titled “Quick checklist”- In Telegram, create a bot through @BotFather and copy the token and username.
- Make sure your personal Telegram username exists.
- In CRM, create or open an agent.
- Fill in the agent name and task.
- Open Telegram in channel connections.
- Paste the token, bot username, and your username.
- Save.
- Send a test message to the bot and confirm the dialog appears in CRM.